My Takeaways From The Book How We Survived in UHF Television A Broadcasting Memoir 1953-1984
Where the Anchorman movies were a good laugh, weaved in between the puns was a story of both the “golden age” of local broadcast television and the genesis of cable television, which had a transformative effect on local television.
As I grew up in western Massachusetts, the local TV station to watch was WWLP channel 22 in Springfield, MA. It was an NBC affiliate who consistently was the ratings leader for news and local programming. Part of that local programming included editorials by the station’s president, Bill Putnam, which were highly informative, opinionated and entertaining. When I heard that Putnam and his then business partner (and now wife) Kitty Broman Putnam wrote a memoir about the formation and the behind-the-scenes of the operations of WWLP, I had to get a copy of it. That memoir, How We Survived in UHF Television A Broadcasting Memoir 1953-1984, includes insider information and photos about not only the founding of the TV station, but the UHF television band and entities like the Federal Communications Commission (FCC).
Though there are many tales which are local to western Massachusetts, from places to politicians, it is a book for anyone who is interested in broadcast communications and its history. For someone like myself who is interested in that and local history in general, it is an interesting tale, spanning over 30 years, of the creation, evolution and positioning of a local television station during a time when broadcast television was evolving and positioning as well. It was of course interesting to learn the why’s and what-else’s about the TV station that I probably spent too much time watching during my own evolution and positioning.
Learning the “inside baseball” of WWLP (whose call letters come from Putnam’s full name, William Lowell Putnam) was of course a great takeaway for me from this book, but there were others that make this an interesting read for others, including:
- Entrepreneurial ventures come different forms - When you think of a business labeled with the word “entrepreneur” one often thinks of a small space with a shoestring budget in a remote office. This was the case with WWLP, whose studios were atop a mountain and was built by Putnam and other staff. Where what you saw on TV looked polished and expensive, it was far from that, and the station also had a stable of investors who help funded the lean operation. Plus in those days, long before high-definition television, studio sets could have been made of cardboard colored by markers and you wouldn’t know the difference.
- The tools are always getting better - This is a term I use quite a bit, especially when describing the evolution of my former Web consulting business, where changes in technology often drove changes in the business model. The same can be said for television, whether it was in broadcast transmitters or from black and white to color pictures. Being aware of these changes and having the capital – both money and time – to address and adapt to them is important in the survival and thriving of any business.
- You’ve got to know when to fold ‘em - Putnam, Broman and company sold WWLP in the mid-1980’s and got out of broadcasting altogether. This was in the early days of the large expansion of cable TV across the US. Though local broadcast stations would get their signal carried on the cable, the revenue model for those same local stations was not defined, nor was it understood what the real impact of cable would be on broadcast. With this on the horizon, Putnam got out of the business early, at a time when he was able to sell for a good profit.
Though How We Survived… hasn’t made many national top-seller lists, it is an entertaining read. It starts technical where Putnam goes into the definitions of what the story of people and places is about. It then ends with recipes by Kitty Broman, who in addition to her leadership role hosted a daily TV show. One thing the book doesn’t do is get into too much detail about all of the various on-air personalities, and only mentions a few of them. One is Bill Rasmussen, who was the sports director at WWLP prior to founding ESPN.
As I do with all of the books I read, I like to give them to others. I am giving this to my friend Tom, as he grew up watching WWLP like myself, and lived near the access road to the mountain-top studios.
Have I convinced you to read this book? Have you read it? I welcome your thoughts in the comments to this post.
This is from The Hot Iron, a journal on business and technology by Mike Maddaloni.
Did you enjoy this? Subscribe to The Hot Iron by RSS/XML feed or Read by Email.
Book Take-Aways • Business • Strategize • Technology • Thrive • (1) Comments • Permalink
Easily Create A UNO Social Site With Free .UNO Domain Name
Personal Web sites are nothing new. Where they started in the early days of the Web – I created my first one in 1994 – they became more popular and pervasive with improved Web publishing tools. Technical knowledge is not even required for most of them, and there are a variety to choose from. So when I heard of UNO Social Sites, I wondered why another brand? When I tried it out and created my own, I found what could be the best way for people of all tech levels to make one.
UNO Social Sites are offered by the .UNO registry, which began offering the .UNO domain name last year when dozens of new global top-level domains (or gTLDs) were made available for registration, I wrote then why I registered my own .UNO domain names and what I felt were the compelling reasons to do so. My intent was to use my domain name, maddaloni.uno, as my personal home page and build a site there. I never did (the domain name now points to this blog), but still wanted to. I don’t need to worry about that as now the .UNO registry has created UNO Social Sites, which are easy to create and customize personal Web sites.
As I mentioned in the above-linked article, I know the people behind the .UNO registry, and they invited me to beta test the service before it went live. After trying it, creating my own site and testing it all, UNO Social Sites, at hello.uno, are now live for anyone to create one, plus get a .UNO domain name… for free. Where some may want this solely because it is a free service that comes with a free domain name, the site you can build is solid and offers some great features. Once you create your account and choose your domain name, you are free to add a variety of information, pictures and feeds to your site.
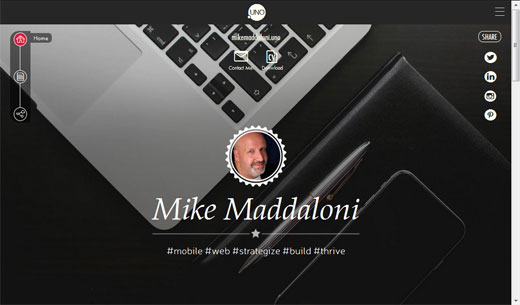
In order to create a UNO Social Site, you need a Facebook account. As I don’t use Facebook personally, I inquired why and was told this is solely for verification of your identity. As you can see from my own page pictured above at mikemaddaloni.uno there is no link to Facebook for me, as I was able to use a Facebook account I created solely for this purpose.
Among the features of the site you can customize are the following:
- Name, photo, tagline, “about me” description
- Background photos – 1 or up to 3 that rotate
- Responsive site templates, which means they size nicely for large and small screens, and within them choices of fonts, text sizes and colors
- A contact link which will send an email to you, as well as an email forwarding address using the domain name
- A link to your CV or resume which you can upload as a file
- Links to your chosen social media feeds, and a snapshot of those feeds
- Something called “My UNO Moments” where you can create a custom collage of photos and text
If all of these customization options are too much for you, coming soon Is the ability to create a page from information on your Facebook page with simply a couple of clicks.
With the variety of customization options, you can create a site with either a social or business focus. Though called “social” sites, you could create a site that is solely for your job search or business, with links and feeds just to LinkedIn, for example. Otherwise you can have it as a multipurpose one as I do for both personal and business. Having the link to your CV or resume upfront is a handy feature, and good way to share more on your profile when exchanging information with a prospect client or job recruiter.
There is also an option to explore others who have a UNO Social Site and follow them. I haven’t used this much other than to see how others have configured their sites, and it has given me some good examples. From what the people at the .UNO registry have told me, these are just the beginning of features and more will be offered in the future. You can see how to setup a site with the video embedded at the bottom of this post, or link here to view it on YouTube.
If you do not have a personal site, or do have one but may want a new approach to one, I recommend getting an UNO Social Site. Whether you have created one, or not, I welcome your thoughts on it in the comments of this post.
This is from The Hot Iron, a journal on business and technology by Mike Maddaloni.
Did you enjoy this? Subscribe to The Hot Iron by RSS/XML feed or Read by Email.
Build • Domain Names • Mobile Technology • Social Media • Technology • Thrive • Web Design • Web Development • (0) Comments • Permalink
My Guest Post On The Barrel Of Monkeys Blog On The Big Wedding Gala Fundraiser
 This past Saturday night, Barrel of Monkeys, a non-profit education arts organization in Chicago, held its annual gala fundraiser. Barrel of Monkeys teaches creative writing to schoolchildren in Chicago, and what the kids write is adapted into sketch comedy and performed by the same actor-educators who are teaching them. It is an amazing program that gets even more amazing results, which is why I am proud to be on its Board of Directors.
The fundraiser was called “The Big Wedding” and was based on a story written by a student in a past creative writing course. A performance of the sketch was part of the event, and it was a not-to-miss event on the city’s social calendar.
You can read my thoughts on the event in my guest post on the Barrel of Monkeys blog. After you read it, I welcome you to peruse the entire Web site and learn more about the entire organization, especially its weekly showcase of sketches, That’s Weird Grandma, which is performed every Monday night year-round (and Sundays for the month of April).
If you have any questions on Barrel of Monkeys, or are thinking of taking in a show, I welcome your questions in the comments to this post.
This is from The Hot Iron, a journal on business and technology by Mike Maddaloni.
Did you enjoy this? Subscribe to The Hot Iron by RSS/XML feed or Read by Email.
Announcements • Blogging • Business • Guest Post • Thrive • (0) Comments • Permalink
Personify Plus Literally Put Me In Front Of The Class

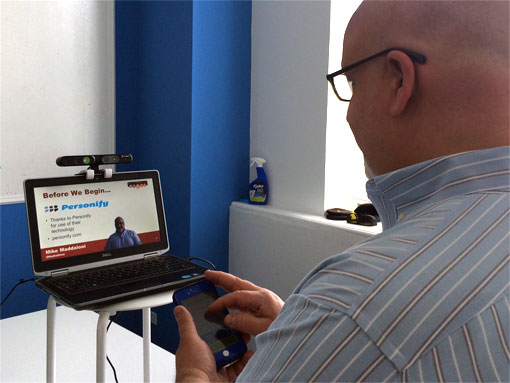
Going into my recent guest lecture on blogging at the University of Wisconsin-Oshkosh, I know I couldn’t physically be there. This wouldn’t be a problem for the professor, Dr. Sara Steffes Hansen, as she has had remote guest lecturers in the past using Skype. Though Skype was also a viable option for me, it would not truly represent “me” as I would want it to – both in my presentation style and how I wanted to present my material.
Pondering this, I recalled a presentation I saw by my esteemed colleague Dr. Dietmar Schloesser, where he used a 3D webcam and software and the service from Chicago-based Personify where he literally “inserted” himself into his PowerPoint presentation which he was giving remotely. So I wondered, could I do the same, without adding unnecessary complexity to Dr. Hansen and deliver an engaging presentation to her classes that would be like me being there?
The Next Best Thing To Being There
Leading up to the lecture, I reached out to Personify and asked them if I could use their “technology” for the lecture. I use that term in quotes as I really had no idea what was involved in this, and to what extent the effort would be on my part as well as on campus at UW-O in the lecture hall. Thanks to help from Personify’s director of marketing Kira and solutions executive Nick, they explained the extremely straightforward concept, got me setup with their service and allowed me to use their office and one of their 3D cameras, when plugged into my notebook PC, allowed me to interact with the students some 4 hours north of me.
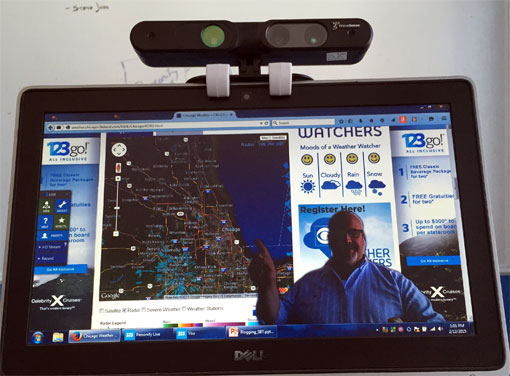
Using Personify Plus is similar to what a TV weatherperson does, where they stand in front of a large green screen, and the effect is that it appears they are in front of whatever image is selected, which is usually weather maps. With Personify Plus, the 3D webcam fulfills the role of the screen, where it isolates you the presenter (or presenters if there are more than one) from the background, then allows the image of you to be literally inserted into whatever presentation or what you put on your screen to share. In this case, I had a PowerPoint presentation. But as you can see from the photo below, I was able to bring up a weather map and use it just as any meteorologist would. Also notice the close-up of the 3D camera and the configuration panel on the left side of the screen.

The Personify Plus software consists of a program installed on a PC or Mac that connects to an attached or installed 3D webcam, as well as to the Personify service. These are both intriguing elements of the Personify experience. Going into this, I really was not aware of 3D webcams, but they have been around, and more and more notebook PCs are being sold with them preinstalled. Also PrimeSense, the maker of the camera that Personify let me use, was recently acquired by Apple. Where everyone has been wondering what Apple would be doing with Beats headphones, I am more intrigued into what they could be doing with 3D! Also, the Personify service allows you to not only run presentations with you in them, but to record them as well. There is also a mobile app which, when logged in, serves as a remote control for the service, allowing you to make adjustments to your positioning as well as advance PowerPoint slides.
Putting it all together was very straightforward. Installing the Personify Plus software and mobile app were also easy. When I plugged in the 3D webcam, the drivers loaded, and then there I was, literally on my desktop. To transmit the presentation, I used Join.me, a free (and paid) screen sharing service. This was recommended by the Personify team as it had a much better streaming and video refresh rate than Skype or other services. So I connected with Join.me, went full-screen on my presentation and there I was, standing in the presentation.
I had to make small changes to the layout of my PowerPoint slides to allow for myself to not block any of the content on the individual slides. This process allowed me to rethink some of my presentation and what I was going to say as compared to what I put on the screen. It was my choice to use the lower quarter of the presentation, as I could have had myself be any size, which is a great option to have for just one person or multiple people.
Just As Successful In The Classroom
Where thus far I have talked about the technical and logistical aspects of my presentation using Personify Plus, what I have not mentioned – and what I was equally concerned about – was how it was received in the lecture hall on the Oshkosh campus. Even though I had discussed this fully with Dr. Hansen, she really didn’t know what to expect. And even though I have seen a presentation using all of this, I did not know how giving one myself would be like without the visual feedback you get from the audience, as this can influence what and how you present.
Fortunately, everyone’s expectations were exceeded with Personify Plus. It felt very natural for me to present, and the students in the classroom were engaged with my presentation, almost as if I was there. Feedback from Dr. Hansen was very positive, and so were the reactions from students in the class which they shared with the #uwonewmedia hashtag on Twitter.
The Next Level Of Online Presentations
I have sat through many webinars and other online presentations, and I admit that many times my full attention is not focused on it. Personify takes presentations to the next level not only with inserting the presenter but increasing engagement. I will sit there and watch all of a presentation, especially as the presenter or presenters themselves will also be changing, more like watching a video and not just a stack of static slides. Where I haven’t given another presentation since using Personify Plus, I am eager to, and have thought of other uses for it, everything from creating business videos to comedy and improv – similar to how many movies use green screens for background scenery, you could do the same for local actors on a small budget.
Have you seen a presentation using Personify Plus, or would you want to? I welcome your thoughts in the comments to this post.
This is from The Hot Iron, a journal on business and technology by Mike Maddaloni.
Did you enjoy this? Subscribe to The Hot Iron by RSS/XML feed or Read by Email.
Blogging • Business • Social Media • Technology • Thrive • (2) Comments • Permalink
Where Did Odiogo Go?

Hello, does anyone know what happened to Odiogo?
As vast and connected and telling as the Internet is, sometimes it is like finding a needle in a haystack about some things. One of them is the fate of Odiogo. It was a service for converting text of a blog post into an audio format using a computerized voice. I heard about the service years ago and have been using it here on The Hot Iron and other blogs of mine since 2007. Last year I wrote a post about Odiogo here at The Hot Iron.
A few weeks back, when I was integrating the new responsive design for this blog and was testing all links and functionality that I found the link to Odiogo did not resolve to anything, as if its servers were down. As I thought it may be a temporary issue I left all links in place. Now several weeks later, when I go to the Odiogo site, the resulting Web page is from domain registrar GoDaddy indicating the domain is available for sale at auction! Clearly somebody did not renew the domain name and the site and service is down.
So where did Odiogo go? Looking back on my own records it’s been several months since a blog post of mine was converted to audio. Any searches I have done on Odiogo did not come up with any new or recently-posted information as to their status. I am at a loss – I feel like I am looking for information on something that perhaps I am the only person looking for it?
If you have any knowledge or experience with Odiogo, I’d welcome you to share then in the comments to this post, or you can contact me directly and how to do so is listed on the About page at The Hot Iron.
This is from The Hot Iron, a journal on business and technology by Mike Maddaloni.
Did you enjoy this? Subscribe to The Hot Iron by RSS/XML feed or Read by Email.
Blogging • Technology • Thrive • Web Development • (1) Comments • Permalink


