2 Ways to Export Your LinkedIn Connections And Information
![]() With the news this week of Microsoft acquiring the business social media site LinkedIn for US$26.2B, the first thought I had was, “gee, when was the last time I exported my LinkedIn connections and information?”
With the news this week of Microsoft acquiring the business social media site LinkedIn for US$26.2B, the first thought I had was, “gee, when was the last time I exported my LinkedIn connections and information?”
As you read that, you may have thought, “gee, I can export my LinkedIn connections and information?” Yes you can, and if you didn't know that 1) you are not alone, as many people are unaware of this, and 2) you still can do it, and I'll show you how.
After all, they are your connections
As you have built your connections and updated your information in LinkedIn, you have compiled a wealth of data over time. For many of your connections, you may not have their business card or any other record of them outside of the site. With LinkedIn's messaging service, you may have been in communication with someone without ever sending them a regular email message. Many people also keep their LinkedIn profile more current than their resume.
With the reality of our reliance on Web services like LinkedIn, this is not surprising. Fortunately they also offer the ability to export key data – your connections and other information it has collected on you, such as your profile. If you have never done it, there's no time like the present, and here's the quick and painless steps to execute these not-so-obvious functions.
Exporting LinkedIn Connections
Whether you have a handful or 500+ connections (LinkedIn will only show you the true number you have and nobody else for some reason), you have the ability to export them. When you perform an export, key information you'll get is name, current employer and title and email address, as most everybody has this information on their own profile. Name and email is in my mind most important as you have a way to reach them.
Here's the steps to follow to export connections.
1. Log into LinkedIn using a Web browser and select Connections from the My Network menu.
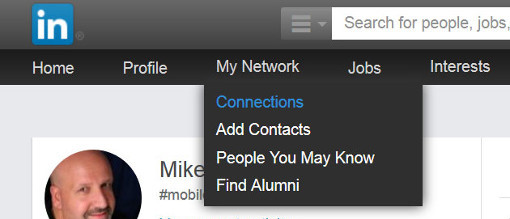
2. Click the gear icon for Settings on the right side of the screen.

3. Click the link “Export LinkedIn Connections” on the right column on the screen.

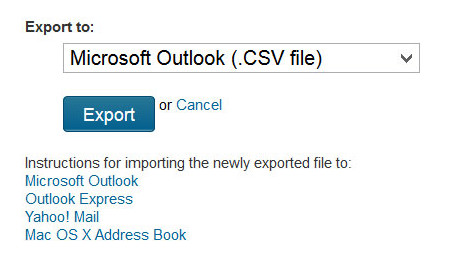
4. You have the option to select the format you want your connections in. I have always selected “Microsoft Outlook (.CSV file)” as this gives me a delimited file I can easily open in Excel or Open Office. The other formats may better suit for importing into another program or Web service. Once you select your desired format, click the Export button.
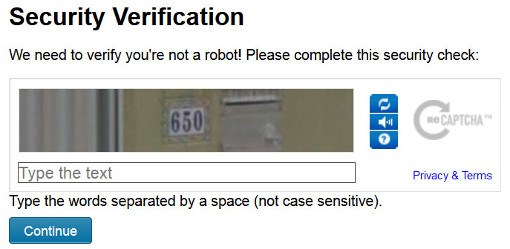
5. You will be prompted with a CAPTCHA for a “security verification” to ensure LinkedIn that you are a real human being requesting your contacts. Enter the CAPTCHA value and click the Continue button.
6. You will get a popup in the browser to save or open the file (the actual appearance of this will vary by browser). Make your choice, in this case I am going to save it.
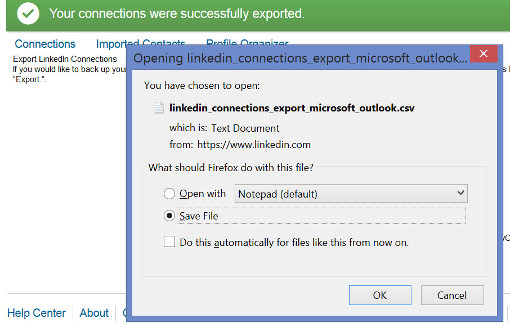
7. Open this file in Excel or your favorite spreadsheet and you can browse and process your contacts.

What you do with your contacts is of course up to you. Even if you have no immediate plan – or time – to do anything with them right now, you at least have a backup of the contacts your spent a long time curating.
Exporting LinkedIn Information
In addition to your contacts, you have profile information and activity performed on LinkedIn, such as messages, etc., which you can export as well, though you may have to wait at least 24 hours to get it. This is probably due more to load on their servers than an element of control (I hope!), but within a day you can get it all, and here's how to request and receive it.
1. Click on your picture icon at the top right of the screen and select “Privacy & Settings / Manage” from the menu.
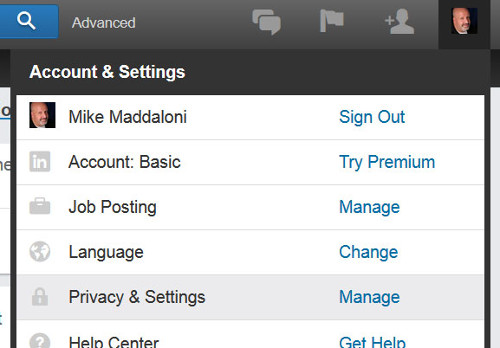
2. Scroll down the page and click the “Getting an archive of your data” link.
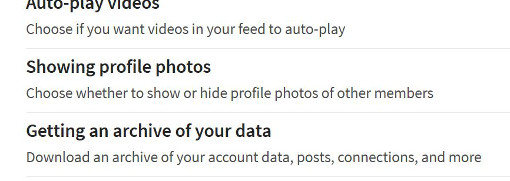
3. Click the button labeled “Download” on the right side of the screen.

4. Wait. The message on the screen will say you will receive an email within 24 hours. In this case I got 1 email with a partial file within a short period of time, and then within a day I got a second email with a link to the entire archive of information.
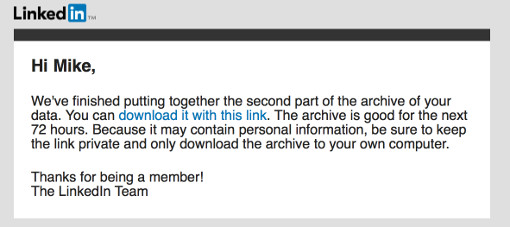
So what's in this archive Zip file? In addition to any images you have posted (your profile picture, banner, etc.) there are several delimited files in CSV format with everything from profile information to what you have searched on. Take a look!
Again, what you do with this – and when – is up to you, but it is yours, and now you have it in your digital hands.
Deconstructing Data Exporting
Since LinkedIn launched in 2003, many, including myself, assumed the service will always be there, every time we want it, as it has been. In the recent past it has added and even removed features, like Answers, where many posted a lot of information. Where it's their platform, at least they realize it is your information and make it available to you. With the unknown of the future, plus a future under Microsoft's ownership, why not get a copy of your LinkedIn information today?
This is from The Hot Iron, a journal on business and technology by Mike Maddaloni.
Did you enjoy this? Subscribe to The Hot Iron by RSS/XML feed or Read by Email.
Build • Business • Social Media • Strategize • Technology • (5) Comments • Permalink
My Digital Backup Strategy
Do you know where your files are?
You know, all of those bits and bytes that make up video of your baby’s first steps, PDF files of your tax returns, those songs from high school you can’t get out of your head. You know... your life!
As our lives become more and more digital, there is more involved in managing those files – our digital assets – so we know what and where they are, and more importantly they don’t get lost forever. In other words, they need to be backed up.
Been There, Lost That
Over the years I have had my fair share of lost data, files, information – whatever you prefer to call it. From misplacing floppy discs to hard drive crashes to not being able to restore deleted files, there are many things I have lost in part or whole. In some cases there were copies of the files elsewhere, whether on another computer, server or in paper form. And in some cases there were not.
From my own experiences and observing and helping others who have lost data and files over the years, I have evolved my backup strategy. This strategy has also morphed based on my computer usage coupled with advances in technology.
Backups from Micro to Macro
I will now share with you my current backup strategy which I have been using for several years now. I will start with the “micro” or day-to-day elements, traveling to the “macro” or more involved.
Keeper Vault – Keeper is a secure app and service I have used on a daily basis for years, yet I am surprised I haven’t written about it before… no time like the present I guess.
Keeper has its roots in secure password management, and that is when I started using it several years ago. Where we don’t often think of logins and passwords as something to backup, try losing some sticky notes or that unprotected spreadsheet of logins and see what happens.
I went with Keeper for 2 reasons. First, only the end user can access their data, not even the Keeper staff. You can read more on the nuts and bolts of how Keeper works here. In short, it’s very secure and I like that. The second reason is I met Keeper’s founder, Darren Guccione, years ago at a tech networking event as he and Keeper are based in Chicago. I met someone passionate about technology, security and consumer usability, and I was sold on his solution to all of them.
Recently Keeper began offering file storage, where you can get space to store files through their digital vault. I began using it but nowhere as I should. I have stored things like a picture of my AAA card, so in case I lose it or am not carrying it on me I can retrieve it on my mobile device, as well as through a Web browser or client program on a PC or Mac – giving me access to these files and information virtually anywhere. You can get a free trial of Keeper or pay US$30 for a year of full features. For me, Keeper is some of the best money I spend on technology.
Mozy Pro Online Backup – I don’t keep a lot of files on my computer, something I’ll get into more later. But I do have some files on it, what I call my “active” files – ones I have recently worked on in some form or another. To ensure these files are always backed up and nothing is lost, I use online backup.
Mozy Pro is an online backup service from data storage giant EMC which I have used for years going back to when I had my own Web consulting business. Mozy has a consumer version called Mozy Home in addition to Pro, but I am only referring to Pro here as that is the only one I am using. I get 20 GB of file backup space for around US$150 per year, and you can pay more or less for more or less space.
With online backup, I can backup files continuously while my Mac (or a PC) is on as a background task. This is convenient as I don’t have to think about it. If I do work on a number of files at once, I can choose to run a manual backup to ensure those files are backed-up and I don’t lose my changes.
Of course the key to any backup is that you can restore a file or files from it. Mozy Pro allows you to do that on an individual or multiple file level. As well, it can give you a bulk Zip file of all files – I know this first hand as once I hosed my new PC’s hard drive when I tried to encrypt it, and had I not done backups before the encryption to Mozy Pro I would have lost all of the files.
Select Files to Protected Portable Drive – I keep a WD Passport hard drive with password –protection on hand to make periodical, manual backups. This drive is small in size but very convenient to work with. The version I have is 500 GB (or half a terabyte) but now you can get them with up to 3 TB (terabytes) for a little over US$100. As convenient as the size is that I can password-protect the drive so any local backups are secured.
Off-Site Networked Drive Backups – Earlier I mentioned I only keep so many files on my computer. This is because I have a NAS, or networked attached storage (NAS), drive at my home. This is my home server, where I store files as well as photos and music and any other file types I have and can access this password-protected drive on my home network. As this is where the majority of my files are, it’s needless to say they need to be backed up.
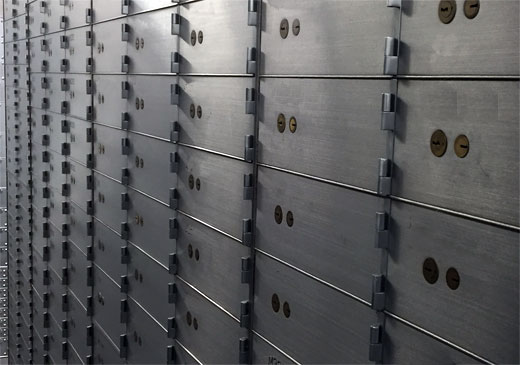
The backup process for my NAS drive is similar to the previous step, where I back it up to hard drives, but with a few twists. I use a Windows PC to run these backups using a program called Robocopy which comes with Windows. It allows me to make a file-by-file mirror of my NAS drive onto the external portable hard drives I have. Following this mirror backup, these drives are then secured in separate, off-site locations under lock and key and additional security. Where I don’t want to say where exactly they are stored, one location may be a bank safe deposit box. Maybe.
For these backups, I typically do them monthly, or more often if I add more files to the NAS drive, like family photos. I will do one backup at a time, namely so that one of the backup drives is always secured in the event of some form of loss or disaster, such as a roof leak and subsequent home flooding, while in the process of performing a backup. After performing one backup and securing it, I will then strive to do the other one within a week of the first.
Deconstructing Backups
Backups are only as good as they are current or accurate, and that you are able to restore from them. This is why I use a variety of backup methods to minimize and reduce potential errors.
I welcome your thoughts and opinions on my digital backup strategy, how it compares to yours, or if it has inspired you to create a process of your own. Please share this in the comments of this post.
This is from The Hot Iron, a journal on business and technology by Mike Maddaloni.
Did you enjoy this? Subscribe to The Hot Iron by RSS/XML feed or Read by Email.
Mobile Technology • Strategize • Technology • (1) Comments • Permalink
3 Challenges of In-App Web Browsers

Quick – how many Web browsers are on your mobile phone?
Now I realize this question may confuse you, but please read on, as I may be talking about something completely new to you or something you know about but didn't realize its full impact and the challenges that come from it.
The Mobile Web Is Still a Thing
With the growth of mobile devices and apps, many predicted the Web would be less relevant. With advances in Web design, namely the concept of responsive Web design, where a Web site will adapt or :respond: to the size of the screen it is presented on, Web sites are still viewed on mobile devices, and this will certainly continue.
To view Web sites on a mobile device, like on a PC or Mac, you use a Web browser. This in itself is an app, and on the iPhone the “native” browser is Safari and on an Android phone, it's Google Chrome. As well, you can install other browsers like Opera or Firefox. Just as on the desktop or laptop computer, some people just use the native browser and others use another. Some use more than one, realizing one may present a Web page differently than another – that difference can be slight, or to the extreme the Web site functionality may not work at all. Unfortunately there is no strict standards that a Web browser must follow to display Web pages, thus the differences.
The More Not The Merrier
As you may guess, the more Web browsers there are, the greater the chance these differences – or errors – may occur. I personally have encountered this many times as a regular Web user, as well as someone who owns and builds Web sites.
To compound the number of apps out there that are Web browsers are apps that serve a unique purpose but also have a Web browser built into it.
Again, my apologies if I have confused you... Web browsers in apps? Which ones? And how many different ones? And why? Where I have some answers to these, I am not a mindreader, though as someone who has designed products as well as software, I will share with you my thoughts as to why, and their impact.
As for the which and how, the image at the top of this post shows 8 apps I currently have installed on my iPhone that have an in-app Web browser. Eight! One is Safari, the iPhone native Web browser, and the other 7 are inside apps. As for the why, this depends on the thought and design of the app owners and developers.
Here's one thought as to why: the chief reason is the user experience – click a Web link in an app and you stay within the app. Granted you can launch a separate Web browser on your mobile device, but the user is then leaving your app, where you want them to stay. Talking with some Web app owners off-the-record, they have also said this, as well as functionality of the app they would like to leverage in the Web browser. So as I said, they have their reasons.
Challenges All Around
After this setup, it may already be obvious as to what the challenges to in-app Web browsers are, and who they impact, including:
Challenges to App Users – Thats you and me folks, the end consumer of these apps and their browsers. There's a real-world example tha
t happened to me that first brought this to my attention.I went to an eCommerce Web site to make a purchase, one I have been to man times on a mobile device as well as my Mac. However a popup window that normally comes up as the last step of the process to complete the order did not appear. I tried and tried a couple of times and it still did not complete the order. It wasn't until I realized I was in an in-app Web browser and not Safari, which I had used in the past. I then opened Safari on my iPhone, tried the order again and it worked just fine.
Even for someone like myself who considers himself a high-end user, I didn't think twice on what app I was really in, and once I did, it still didn't matter, as I wondered why the Web page didn't work?
Challenges to Web Site Owners and Developers – One of the greatest challenges to those who run and build Web technology is that their Web sites and Web applications work in browsers. This may be even more challenging than the site being of value and compelling to the end user.
Going back over 20 years there have been the need to test and verify Web sites on all PC and Mac Web browsers, as well as on other computer operating systems, which back then you could count on one hand. Add to it mobile devices, tablets, watches and multiple brands of browsers on each, not to mention different versions (not everyone is on the latest version!) it can be overwhelming.
Overwhelming, and expensive. The need for a quality assurance (QA) lab, equipment (basically at least one of each piece of hardware), staff, third-party consultants, services and software... you don't even need to be technical to realize the magnitude of it.
Challenges to App Owners and Developers – If you decide you need/want a Web browser in your app, you are basicaly doubling the functionality to build and support in your app. A Web browser is a beast all into itself – and now you have one. You need to test your browser with the latest Web technologies and standards, consistently. You also need to keep up with the competition – standalone Web browsers – as to their features and how they deliver Web pages. And where you have the staff to develop your app, you will need to expand it for the Web browser functionality as well.
This goes beyond the technology and into your product management and development. Where it may be ideal to have that tightly integrated browser, the overall question must be, at what cost?
Supporting not Scaring
As business needs and technology are always a moving target, it's good to have an idea of what may be in case you ever lose scope or focus on it. I hope after reading this I haven't scared you – saying you have almost a dozen of something when you had no idea can be a bit much.
I welcome your thoughts on multiple Web browsers in the comments of this post. I promise not to scare you anymore now... on this topic anyway!
This is from The Hot Iron, a journal on business and technology by Mike Maddaloni.
Did you enjoy this? Subscribe to The Hot Iron by RSS/XML feed or Read by Email.
Build • Mobile Technology • Technology • Web Design • Web Development • (1) Comments • Permalink
Google Contributor Offers Interesting Approach To Blog Revenue
Editor's Note: Google Contributor is no longer operating for general use as indicated below, and this post was edited to remove links to their Web site and embedded elements that are no longer functioning.
Would you pay money to read The Hot Iron? And what if by paying you saw less ads on the site?
I know I have asked this question before when I added CentUp to this very blog. Another new revenue model for writers has come about from Google called Contributor. As I have no illusions (delusions?) of grandeur in earning a living from this very site alone in itself, I was more intrigued to try it to how it really works.
How It Works
Google Contributor allows a Web user to contribute money monthly for ads to not be shown on Web sites it visits. The ads specifically are ones from Google’s own ad services, AdSense and DoubleClick. So if a banner ad comes from another source other than Google (and there are many) that ad will still appear. In the place of the ad it may be blank or a thank you message for supporting the particular Web site.
From the Web site owner’s perspective, if they are displaying on their site through Google, rather than getting the money for someone seeing and clicking on an ad, they are getting money from the user’s Contributor account, in a sense offsetting the cost of the ad usually paid by the advertiser.
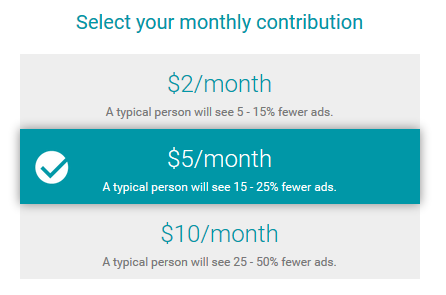
A few items of note on Contributor. Currently it only works in the US. By someone contributing money, either US$2, US$5 or US$10 a month, they are still going to see ads. As shown in the chart below, by contributing those 3 previously mentioned dollar figures, they will see respectively 5-15%, 15-25% or 25-50% fewer ads. These fewer ads are across all Web sites with Google ads not just one in particular. So if you contribute $10 a month, thinking it will all go to me for reading The Hot Iron, it will not.
Is It Worth It?
That’s a great question – is it worth it? I honestly don’t know, as I have just set it up on the blog, and I have also signed up as a Contributor at the whopping US$2 a month level.
Here is a screenshot of this blog with an ad appearing at the top:
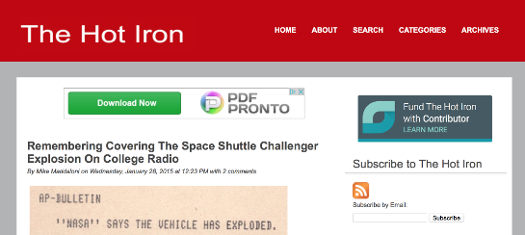
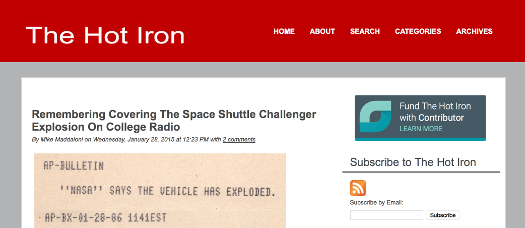
I know – the difference is amazing!
It will be interesting to see how often I notice the ads not there. Last year was the 20th anniversary of the Web banner ad. As I heard somewhere – and I forgot the source – it was marking 20 years of people ignoring banner ads! So even if it technically works, it will be interesting to see if anyone notices.
Are you a Google Contributor? Did I convince you to join, or not join? I welcome your thoughts in the comments of this post.
This is from The Hot Iron, a journal on business and technology by Mike Maddaloni.
Did you enjoy this? Subscribe to The Hot Iron by RSS/XML feed or Read by Email.
Blogging • Business • Technology • Web Design • Web Development • (2) Comments • Permalink
Jackery Battery Chargers Big And Small Do The Job
Once upon a time you could easily remove the battery from a mobile device. This made it easy to keep a charge as you could simply swap out a dead battery for a fresh one. Of course you would have to charge the removed battery, and you could either charge it in the device or in a special battery charger.
Where the above scenario sounds like ancient history, it was less than a decade ago that you could do this. Today most mobile devices have non-removable batteries. Granted “non-removable” is a relative term as you can remove anything, it’s just that the device isn’t designed for it to be easily removed, and in doing so may void its warranty. As a result, spare batteries have been replaced by external battery chargers, and have spawned a whole new industry, especially as having 1 or 2 seems to never be enough power.
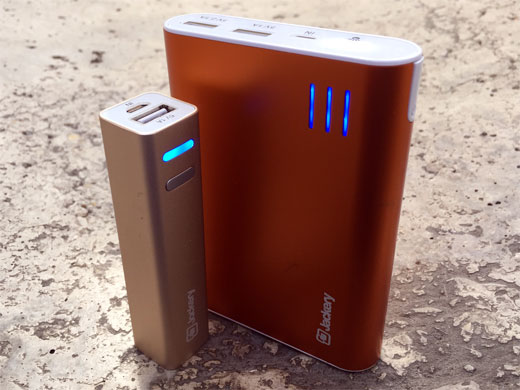
Recently I was offered the chance to evaluate external battery chargers made by Jackery. Where I have seen this brand before, namely on Amazon.com, I had never used one. In this eval I was also offered to choose which battery charger I would like to try. As I couldn’t choose between their largest and smallest models, the Giant + and the Mini, I asked if I could try both, and they said I could.
In my review I didn’t plan out anything specific, as I simply wanted to use them as I would any battery charger. I also had my wife use them as well, not specifically saying why I had them. Also note I am not an electrician, and I can’t speak to power ratings or usage, only from a lay person’s point of view. Judging from most people who read The Hot Iron, I am not disappointing anyone with that last statement.
Giant + – Multiple devices, multiple charges
The Giant + is a battery charger you most likely won’t carry in your pocket, this is unless you’re going to a festival concert, which I did this past fall when I took it to Riot Fest. I also have used it to charge multiple device at home, such as my iPhone and iPad. It was also the power source for my modern-day attempt at a boom-box, charging both my iPhone and a Bluetooth speaker which played at our neighborhood block party.
The main features of the Giant + are that you can charge 2 devices at once, and that you can charge devices multiple times. In my charging, I was far from scientific, but many times I had multiple devices charging to 100% at once. There is a 3-bar light indicator which tells you the battery level, and the accompanying charge cable would replenish the battery pretty quickly – at least overnight, which is what I most often did.
Another feature of the Giant + is an LED flashlight. By pressing a side button twice, the flashlight turns on and off. I’ll admit I didn’t really use this in a real-world situation, as I always had enough light, typically from device screens, to plug in to it. But I did try the light in the dark and it is plenty bright. As it’s not a battery you may typically carry around with you, I am not sure if the light often used, but I would love to hear from someone who has.
Mini – Topping off the fuel tank
As I said before, I have several battery chargers, namely as all of my devices have weak batteries and constantly need recharging. Where I have used the Giant + to bring a device back from the dead, sometimes it’s nice just to top off a charge or have a spare battery just in case. The Jackery Mini came in handy for both situations.
The Mini is just that – small, compact and can easily fit in the same pocket as your device… that is, if your device can fit in your pocket itself, but I digress. This battery is one my wife would take with her to charge her phone. It has a push button where up to 4 LEDs illuminate in extremely bright blue to indicate the strength. I have also kept the Mini in my backpack with a spare charging cable if I ever needed a top-off.
Solid and stylish
Both the Jackery Giant + and Mini are solid. They have an aluminum outer shell with a shine to them – the Giant + I had is bright orange (a color I love!) and the Mini was close to what Apple calls “rose gold” but they call it just gold. I of course have dropped both batteries, and they have held up well, though they mostly just fell off my desk.
As for the price, I have seen a variety of ranges, and as I am posting this close to Black Friday and Cyber Monday, I am sure there will be deals on it. In all cases, the Giant + is more than the Mini.
For portable power, these backup batteries from Jackery performed well for me. They also offer many other styles, as well as cases. And after having them hands-on, I am glad I couldn’t decide which one to review, as they each have their own uses. If you have used Jackery backup batteries before, or have any questions on these, I would like to hear from you in the comments to this post.
This is from The Hot Iron, a journal on business and technology by Mike Maddaloni.
Did you enjoy this? Subscribe to The Hot Iron by RSS/XML feed or Read by Email.
Mobile Technology • Technology • Thrive • (0) Comments • Permalink


